

Last weekend, as a part of the #WeekendCookingProject Nabeel and I baked some cookies..real creepy Halloween cookies.

Halloween is few days away and the buzz created by the infinite Halloween events organised across the city encouraged me to have a little celebration of our own. It was also a good way of introducing this spooky festival, of witches and ghosts, to Nabeel.
We picked up the Basic Sugar Cookie Dough from here and set off! This cookie dough has eggs but I have also shared (below) a tried and tested recipe of Eggless Cookie Dough, in case someone is not in mood for eggs or probably has run out of them.
Shaping and giving the final touches to the finger cookies was what Nabeel enjoyed the most and of course, serving them to his frightened friends. He introduced the cookies to them as “my mom’s fingers” and the terrified beings came running to me in order to cross check. How innocent! 🙂

Making Halloween Finger Cookies is pretty simple and the end results looks like a real work of painstaking art. They make a wonderful decor too if you don’t find them appetizing enough to eat 🙂
So, get set for Halloween by trying out these simple finger shaped cookies.
Halloween Finger Cookies
Makes 15 to 20 finger cookies
Ingredients
½ cup powdered sugar
½ cup butter, cold
1 cup flour
½ teaspoon Vanilla essence
½ teaspoon baking powder
Milk, if required
10 to 12 Almonds cut into half
Any Red colored, Jam or sweet sauce
Method
Step 1 – In a dry bowl, place butter and sugar together. Cream them using a whisk.
Step 2 – Beat the mixture, till light and fluffy.
Step 3 – Add in the vanilla essence, mix.
Step 4 – Carefully fold in the flour and baking powder, mix gently to make dough. Use a spoon or two of milk, if required.
Step 5 – Rest the dough in fridge for 10 mins before shaping into fingers.
Step 6 – Divide the dough into approx 15 to 20 parts and shape into cylinders, they should be unevenly thick.
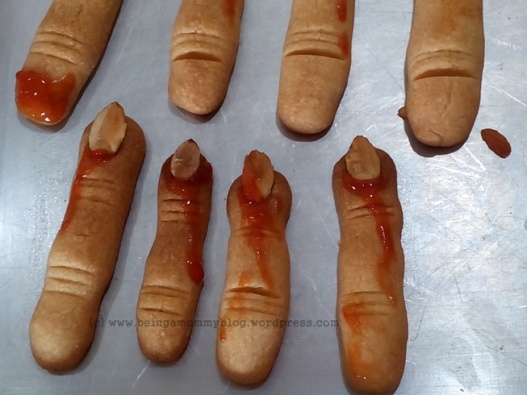
Step 7 – Place the shaped cookies on a greased baking tray and then stick a almond halve (skin side down) on the top end, to work as nails. Make wrinkled skin marks using a knife, look at your fingers for inspiration 🙂

Step 8 – Place the cookies in a hot oven which has been pre-heating for 10 minutes at 160 C. The cookies should bake in about 15 minutes.
Step 9 – Remove from oven and cool the cookies.
Step 10 – To give the final look, carefully pull out the almond and put a blob of the red jam or sauce in the cavity. Place the almond back, pressing it gently so that the blood oozes out. You can also paint some blood over the other areas of the finger to make them look bloodied and creepy.

Happy Halloween!
Connect with us on Twitter, Pinterest & Facebook. Follow the blog to get recipes right in your inbox!
Till then, Love Being a Mommy!


Wow these are amazing! So creepy looking! I wish I was this artistic 😂
LikeLike
oh these are so gross looking! well-done!
LikeLike
THis is the first time I am saying “ohh my they look digusting!” for a recipe!😂 For this situation it is a compliment! They look so real!
LikeLiked by 1 person
Hahaha…and for the first time I don’t mind such a comment for my recipe 🙂 Thanks
LikeLiked by 1 person